My clients’ renovation is still in the works so I wanted to fill you in on some more of their progress and offer some thought and consideration on a few of their latest endeavors.
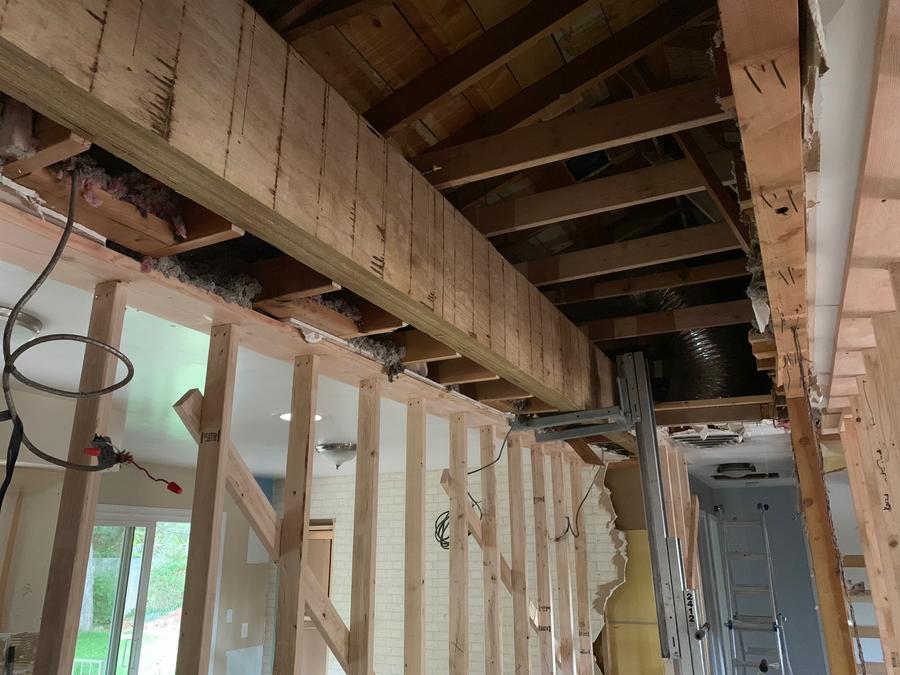
Installing the Supporting Beam
To open up a home’s floor plan, which was previously walled off, requires a new support structure to ensure the weight of the home is distributed evenly. Placing a supporting beam through the central part of your home in the ceiling or attic and placing a footer in the basement are two ways that keep your home properly supported. Before removing any load bearing walls, make sure you have full approval and contractual design from a structural engineer. (Please see last month’s blog post for more info on that). An engineering consultation and blueprints for construction from your engineer will guide you correctly in this process. As a general rule to understand which walls may be structural, look at the direction that the floor or ceiling joists meet the wall. If they are perpendicular and rest on the wall, then that wall is likely load bearing. If they run parallel to the wall, then most likely they are not load bearing. I stress, however, to always seek the help of a professional in a situation where load bearing walls are going to be removed so there is no risk of creating issues in the future.
My clients sought the professional help of a structural engineer who created specific plans for them to follow. First, temporary walls were constructed to hold the load, followed by drywall removal from the load bearing walls. Next, the beam was ordered and delivered to meet the exact specifications required for supporting the open floor plan. A large space was cut through the ceiling joists in the attic to allow the necessary room for placing and securing the beam. With the help of material handling jacks and several strong people, the beam was raised up into the attic and securely bolted. Next, a footer was dug out in the basement to ensure the weight of the new floor plan was evenly supported from below. The footer was then filled with concrete and the supporting columns were placed and secured. Next existing ceiling joists were tied into the beam using strong tie hanger brackets. New ceiling joists were sistered (overlapped) to fill in the gap left by the wall removal. Lateral bracing and roof kickers were the final steps before the temporary walls could be removed. The structure was now supported from above and below and the reality of an open floor plan was now beginning to take shape.
Building a Staircase
Like many older homes in the Denver area, the placement of the staircase was not ideal to create a nice open floor plan. In this original floor plan, my clients’ stairs were running down the center of the home, forcing the living space to be segmented. Because their goal was to open up and join the living spaces, they looked for options that would be a better location for the basement stairs. After measuring and calculating the required space, they decided to run them perpendicular to the entry along the far wall of the dining room which allowed for a better flow for the open floor plan, and maximized the living space. Once the plan was drafted, and the measurements were confirmed, construction began. A large rectangular space was cut in the floor for the stairs to descend to the basement. Then my client was able to construct the landing. Because the space required an angular landing, he verified with the city that he was within code on the risers and treads. Then he began measuring, cutting, and constructing, and the landing was complete. Next came the stringers which house the staircase from the upper floor down to the landing in the basement. The correct number of cuts and measurements ensured each rise in the staircase was built to code. Three stringers were secured to create a well-supported staircase. Finally the treads were cut to size and fastened together to create the steps.

Installing Recessed Lighting
Like many homes built in the 1960’s, the lighting in this home was sparse and in need of updating. A licensed electrician came in to help them start the process. To begin, a diagram was designed which outlined a clear plan for general lighting, task lighting, and accent lighting. The goal was to create a lighting pattern in the home that was functional and beautiful. A few thoughts on this: ensure lighting is placed above workstations and not behind where you’ll be sitting or standing or you’ll be working in shadows; recessed lighting should be placed at least two feet from the wall; and follow the rule: recessed light bulb diameter in inches to recessed light fixture placement in feet. A four inch diameter recessed light fixture can be placed four feet away from another four inch diameter recessed light fixture. Choose your fixture size based on your ceiling height - if your ceiling is quite tall or vaulted, a five or six inch diameter fixture would be appropriate to emit the proper illumination. A four inch diameter fixture would be appropriate for standard ceiling heights. Next, the fixture housings need to be secured in-between the ceiling joists. This requires exposed beams or cutting appropriate size holes in the ceiling drywall using a hole saw attachment or a handheld drywall saw. After housings are installed, wiring comes next to create circuitry. Think about creating an ambiance in your home with your lighting system. Determine where you’d like your light switches/dimmer switches, which lights you’d like to be on a three-way switch and how you’d like your lighting grouped. Illuminating your home brings brilliance, highlighting, and character when you create a system of lights that work together to display the home’s natural beauty, so use some strategy when deciding how many lights to connect within a zone. Next the wiring of individual lights and zones need to be hooked up to the switches on the wall. Again, the simple way to make this happen is exposed studs to string the wires from the ceiling down the walls to the light switches. If your studs are not exposed, then feeding them through the wall down to the switch will be your best plan. Installing recessed lighting requires time, thought and skill, but the final effect is worth the effort as your home will be radiantly lit.
Next month in Tips for Remodeling your Home Part 3, we’ll discuss a few more steps in the process of home renovation and tips to consider for basic electrical, hanging drywall, and installing hardwood floors.
https://www.bobvila.com/articles/consider-before-installing-recessed-lighting/
https://homefixated.com/how-to-install-a-header/