This month we’re discussing radiant floor heating. Over the years, I’ve had many clients inquire about this and some of my clients recently installed this type of heating system in their home so I thought it would be insightful to give you an overview including it’s benefits and how to install it yourself.
What is Radiant Floor Heating?
Radiant heat is the effect of the warmth you feel from a fire or another heat source like the sun. Unlike conduction or convection which heats the air, heat energy is transmitted through electromagnetic waves also known as infrared waves which thermally warm up the mass to which they emit their radiation. In this case the heat is derived from hot water that runs through the pipes below the floor. It warms the feet which warms the whole body more effectively than forced air or baseboard heat.

What are the Benefits of Radiant Floor Heating?
It’s more efficient than forced air because the body is more comfortable at a lower air temperature when radiant energy is the source of heat. Imagine standing outside on a clear sunny day in winter versus a cloudy overcast day. Your body receives the energy from the sun in the form of radiant energy and feels warmer even though the air temperature is the same in both instances. The same occurs when you’re utilizing radiant heat in the home - your thermostat doesn’t have to be set as high in order to feel it’s warming effects.

Radiant heat doesn’t blow air which often includes dust, dirt, viruses and other debris nor dry out nasal passages which can cause illness and allergies especially during the cooler months.
It’s also a safer option for those with children. There are no concerns about vents, registers, fireplaces or wood stoves that can cause danger to little hands and feet (or toys!).

Radiant floor heating is simple and unobtrusive. There are no baseboards, filters or fans. The system is quiet as it’s working within the floor.
It’s also environmentally friendly as it puts out fewer emissions than standard heating systems and can use solar power as its main energy source.
Generally purchasing a radiant floor heating system will cost you less than purchasing a conventional heating system and it doesn’t require a boiler. The water heater you would need for a conventional heating system will handle the job perfectly. And when you purchase directly from the company you cut out costs of suppliers and middlemen who will upcharge you unnecessarily. Customers tend to save 25% on their energy costs when using radiant heat as opposed to standard heating options because of its overall heating efficiency. Radiant heat tends to keep warmer air closer to the lower portion of the room where standard heat tends to rise and cool. Lastly, installing your own radiant floor heating system is another way to save money.
What are the Steps to Installing Radiant Floor Heating yourself?
First, it’s necessary to determine the location and size of the heating system required to warm your home effectively. This can easily be estimated by speaking directly to a radiant floor heating company that will accurately assist in your ordering. In this case, we will be discussing a system that is closed and installed in the floor through the ceiling below.
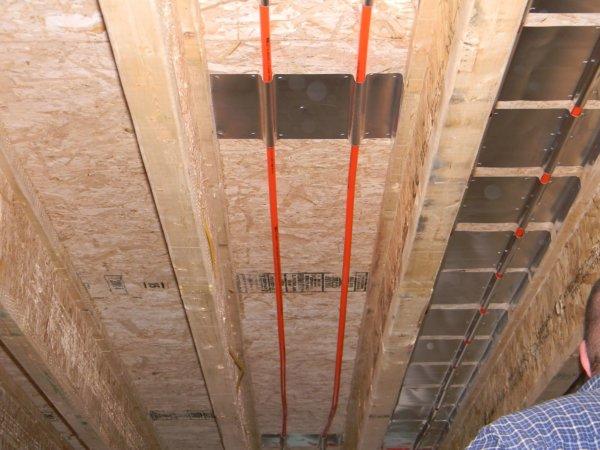
With your order, you’ll receive a system manifold and very specific instructions and tutorials on how to begin installing your system. The company will give recommendations on the type of tubing that would suit your home best. Once you purchase your tubing, lay out your zone plan with equal lengths of tubing in each zone. Next drill holes on one end of the ceiling joists 3 inches from the top which keeps the tubing close to the floor which you are planning to heat. For ease of installing the tubing, drill holes to the largest allowable size which can be determined by checking with building codes. Next install the tubing runs. This is best done with the help of another person. There is a science to this process. However, in simple terms, pull out loops of tubing and run it through the joist holes leaving it slack in each bay working from the furthest bay from the manifold and then running that zone’s tubing back to the system manifold.
Once each zone has been tubed and the loops have been stapled to the ceiling, you can pressure test the system with air. If the air pressure holds for 30 minutes with no drop in psi and an overnight air pressure test stays steady within 2-5 psi, then your system is sealed. Install aluminum fins to permanently secure the tubing to the ceiling and aluminum reflective foil along with insulation to keep your heating system intact and minimal energy lost. Lastly, plumb the system manifold to the boiler/hot water heater and your heating system will then be ready to output warmth through the form of radiant floor heating.
For more detailed information about radiant floor heating, or to estimate costs on a system for your home, you can visit www.radiantec.com.
https://www.radiantec.com/about-radiant-heating/
https://www.dictionary.com/browse/radiant-heat
https://www.thegreenage.co.uk/convection-vs-radiant-heating/